
by Amber Miller | Jul 28, 2017 | Infusionsoft, Infusionsoft training
If you use Infusionsoft and WordPress, and you want to simplify and beautify (that’s a word right?!), your opt-in forms, there’s an easy solution…the Infusionsoft Form Tool WordPress plugin.
This new plugin allows you to create opt-in forms right inside of WordPress so you don’t have to switch back and forth between applications, you can design it right on the page and easily add forms on multiple pages too.
It’s easy to get started, and we have all the steps below:
Step One: Install the Plugin in WordPress
- Sign into your WordPress admin account.
- Within WordPress admin view, navigate to the Plugins tab on the sidebar.
- Click the Add New tab under the Plugins
- Search for Infusionsoft Official Opt-In Forms from the search bar found on the top right corner of the WordPress plugin directory view or click here to download it directly.

Step Two: Connect to Infusionsoft
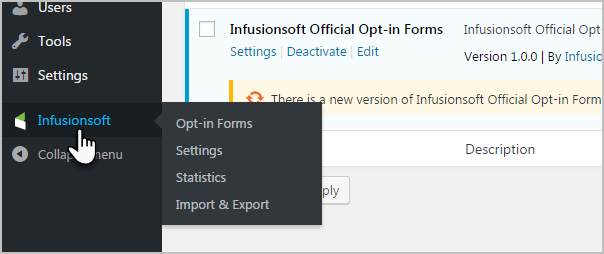
- In WordPress you’ll now see a new item on the left menu: Infusionsoft.
- Hover over this menu item and click Settings.
- Click the New Account
- Enter your application name. This is in your browser window, right before Infusionsoft.com. For example: abc123.infusionsoft.com. Your application name would be abc123.
- Enter your API key. Log into Infusionsoft; select Settings from the Admin menu. Scroll all the way down the page and you’ll see a section called: API. From that section copy the text next to Encrypted Key Value.
- Go back to WordPress and paste the value you just copied into the API key field.
- Click the Authorize button – you’ll be all set!!

Step 3: Create an Opt-In Form:
- From the WordPress dashboard, click on the Infusionsoft link to expand the sidebar and click Opt-in Forms.
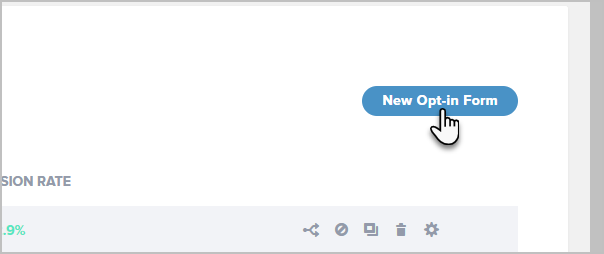
- Click on the New Opt-In button on the top right corner of the page from the Opt-In Forms sidebar tab.
Choose what type of opt-in form you would like to use:
- Pop Up Opt-In Form: The form will appear automatically after a specific amount of time, after visitors reach a particular point on your page, or even after visitors leave a comment or make a purchase – your choice!
- Fly In Opt-In Form: This form slides in at the bottom of your visitor’s screen, and you can set it to appear after a specific time or at a specific point on the page.
- Widget Opt-In Form: Use widget forms to create attractive opt-in forms for your sidebar, footer, or any other widget-friendly areas on your website.
- Locked Content Opt-In Form: Protected content forms allow you to offer content your visitors can “unlock” by opting in.
- Below Post Opt-In Form: You can use “Below Content” forms to place an opt-in opportunity at the end of your blog posts or pages. Visitors who read an entire post are highly engaged, so this is an effective way to turn that engagement into a conversion.
- Inline Opt-In Form: Want to insert an opt-in form in the middle of a blog post, rather than the end? Inline forms make it easy. You can display these forms virtually anywhere you’d like on any post or page on your website.
- Notification/Opt-In Bar: Increase your opt-ins, announce your promotions and drive traffic to the pages of your choice by using the attention grabbing top-of-page banner.
- Enter a name for your opt-in form then click the Next: Design button to advance to styling your opt-in form or click the Save & Exit button to save the opt-in and return later to edit its design and display settings.

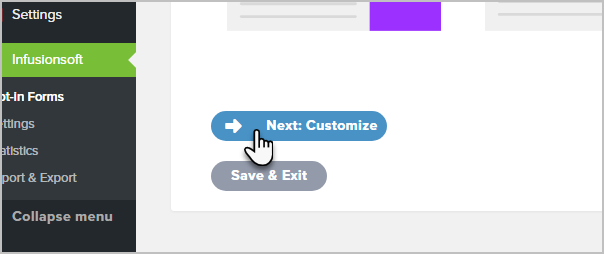
- Choose one of the form layouts then click the blue Next: Customize button at the bottom.

- Choose one of any pre-designed templates based on preferred color and style. You can alter these colors after you select a template.
- Once you select a template, the screen will scroll to the bottom where you will click the blue Next: Customize button to advance to the next part of customization.

- You may customize the following on your opt-in form: copy, header, message, image, styling, background color, add your own CSS, and so much more too!
- Click the Preview button at the top right of the page as you make style changes to view your progress.

After customizing the above settings, you can click the blue Next: Display button to customize a ton of additional elements. Some of the ones we think you’ll use most often are:
- Trigger after time delay and how long: You can control when you want your form to appear.
- Trigger when a page element is clicked: If a visitor clicks a link your form will appear
- Limit to one display per session: Allows visitors to have a good website experience
- Choose where to display your form.
Click here to view all available options.
Once you have customized the above settings, you are finished the form setup process!
Step 4: Finalize Your Form
To finalize, you must click the gray Save & Exit button at the bottom of the Display Settings tab, and you’re all set.
If you want to use your form as part of a campaign, follow these steps:
- Navigate to Campaign Builder.
- From the campaign goal section on the left-hand sidebar, locate the WordPress Goal goal and drag it onto the campaign canvas.
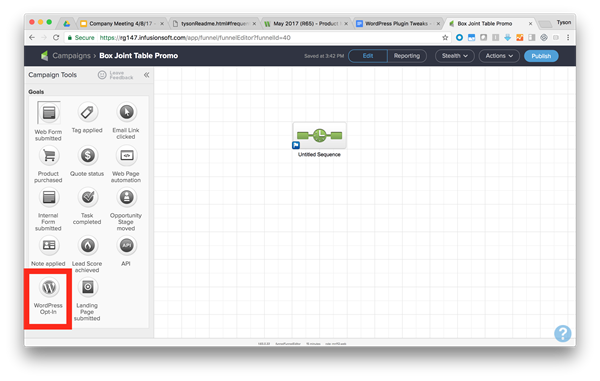
- With the WordPress Goal on the canvas, double-click on the goal to designate which Infusionsoft WordPress opt-in form completes this campaign goal.
- Select the name of the opt-in form from the drop-down list. If you have a long list of opt-ins, type the name of the desired form, and the form in the list will appear.
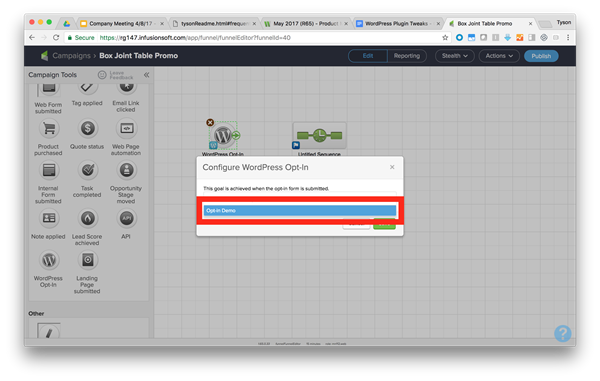
Once you select the desired opt-in form, finalize this configuration by clicking the green Save button. Then you’re ready to build out the rest of your campaign.
The Infusionsoft WordPress plugin is a great tool, but if you’re not sure how to set up or the best options to select, just reach out to the Smart to Finish Team. We’re always ready to help!
by Amber Miller | Jun 2, 2017 | Blog, Infusionsoft, Marketing
If you’re ready to spend more time in the sun this summer, you can transform your business (and life!) by harnessing the power of Infusionsoft, a marketing automation software. Every day there are a ton of details you must manage in your business and Infusionsoft can automate almost all of them. Here are just a few of the ways you can put your business on autopilot:
1.Turn Visitors into Leads
You can use Infusionsoft’s ready-made lead capture forms to collect data on all of your website visitors. Once they sign-up you can automatically send them a welcome email, include a free download, track when your new lead has downloaded their gift, and even remind them automatically if they forget!
2. Engage Your List
In today’s email heavy world, personalization is key to creating a brand your leads and clients want to engage with. Infusionsoft helps you capture important data and then use it to ensure your contacts receive the information they truly want. You can then use these details to segment your list, trigger emails based on email opens, clicks, or payment history, create and send special targeted promotions and more.
(more…)

by Amber Miller | May 13, 2016 | Social Media
If your small business hasn’t taken the social media plunge and started a social media marketing campaign, now is the best time to jump in. Marketing is all about engaging in conversations with customers, problem solving, promotion of your products or services and educating your customers. Social media can help you generate new leads as well as establish a client base that encourages them to purchase from you again and again. What better way to engage your customers than through social media outlets?
Here is a short list of reasons to take that social media plunge:
- Create a “buzz” about your products or services. Buzz marketing allows a business to increase awareness about their product by growing online traffic. Get consumers talking about your products, services or company by utilizing social media marketing campaigns. Create an event to promote your products or services then have customers share experiences or engage in conversations. Examples of this would be to start contests on Facebook or Twitter that give followers a chance to win prizes. You can also ask consumers to follow you on Twitter and re-tweet a specific tweet to be eligible for a contest.
- Build your brand. Social media makes it easy to build your brands identity and increase brand awareness. You can successfully establish your brand and make it relatable to a specific demographic.
- Social networking with current clients and prospects. Personal conversations can be held with customers by using social networking sites like Facebook, Twitter, Pinterest and Instagram.
- Create traffic. A study by Balihoo indicates that, “91% of local searches use Facebook to find local businesses online.” Being active on social media will help you increase the quantity of traffic that your website receives. Successful social media campaigns will likely improve the amount of traffic referrals your website receives, playing a role in business sales.
- Communicate with customers. Social media gives a business the opportunity to interact with and receive valuable information from customers. In addition to a customer service email or phone number, social media is another way to monitor and be part of the dialogue about your product or service. This platform makes it possible for a business to provide tips and solutions in real time. In other words, social media gives small businesses an opportunity to host the conversation about their product or service and gives them the power to mediate and correct issues that may occur.
- Move up in search engines. Social media’s importance in a website’s SEO ranking continues to increase with the current popularity of social media. If you company is being talked about on social media, chances are Google will consider your website to be authentic, helping your SEO ranking. It is important to use high-quality content and links on your website. This information is evaluated and used as part of an algorithm by Google, contributing to your site’s ranking in the search engine chain.
- Social media helps increase trust in your business or brand. Customers can become overwhelmed by the number of choices they have for certain products and services. Customers want some type of indication that your business is authentic before making that first contact. Having an active social media presence helps fill an impending trust that indicates you care about your customers and that you can easily be contacted.
- Target a specific niche. Your business can use social media advertising to target by specific demographics, zip code, keyword, demographics, etc. Twitter is an excellent site to start reaching your niche market. Hash tags and lists are used to help you generate leads. Linkedin and Facebook also offer ways to connect to people with the same or similar interest groups.
Developing successful social media marketing campaigns has become an important tool for small businesses, and it should be utilized for all of its benefits. It provides a cost-effective way to build a community, that can potentially enhance the experience for both client and business owner. The trend of social media is still going strong and there is no indication that it will be halting in existence any time soon. Is your business missing out on this incredible opportunity?
If you and your staff are too busy or uncomfortable with the process of social media marketing, you can hire us to be your social media expert!
Sources
Pingler. Creating A Buzz With Social Media. July 9, 2011. Retrieved from https://pingler.com/blog/creating-a-buzz-with-social-media/ on September 15, 2015.
Forbes. Jacquelyn Smith. How to Use Social Media to Make Sales. January 10, 2014. Retrieved from http://www.forbes.com/sites/jacquelynsmith/2014/01/10/how-to-use-social-media-to-make-sales-2014/ on September 15, 2015.
by Amber Miller | May 9, 2016 | Blog, Wordpress Maintenance
Google has stayed to true to form and changed its rank algorithm yet again. With technology constantly changing, they need to do this in order to get a true sense of what people are doing in the way of searching. Unfortunately, that means you need to once again examine your website and make sure it is Google-friendly, or you will find yourself sitting there and wondering why your Google ranking is steadily dropping. The main item you need to take a close look at this point is whether or not your website is mobile-friendly.
A Mobile World
With the increased use of phones and other mobile devices being used to surf the web, sixty-one percent of all users are now mobile users. If your site is not ready for them, you could see your traffic decreasing by as much as one-third. That can add up to a lot of users – and much lower Google rankings.
What You Need to Know
- In order for Google to rate your site higher, it must determine that it is mobile-friendly. To make it possible for this determination to be made, the Googlebot must be able to scan your CSS and JS files, and it does so on a page-by-page basis. This means every one of your pages must pass the scan in order to be ranked.
- Google will put greater emphasis on the loading time of graphics, so you need to make sure they are optimized to the fullest.
- Avoid using small text and flash or it could seriously lower your ranking.
Achieving Mobile-friendly Status
Responsive design is the easiest way to insure your website is mobile-friendly. This newcomer on the scene is created to allow your website to seamlessly adjust to whatever device it is being viewed on. By designing for smaller devices first, responsive design makes it easy to incorporate sizing for all devices – and help Google find you.
If you need help making your website mobile friendly, reachout! Having a support team that stays on top of technology is very important!
by Tina Walker | Apr 19, 2016 | Blog, Marketing
The Divas have been listening to me for months talk about how much I love the Divi theme. I mention it on team calls, I mention it on team Skype and I almost feel like the team might roll their eyes when I suggest it being a good fit for multiple projects. Somedays I feel as if I chant the name “Divi” over and over. Let me share with you why I love it so much, and what it can do for you.
What is Divi?
Divi is a multi-purpose theme created by Elegant Themes. For me, as a developer, it’s the ULTIMATE WordPress theme with endless possibilities for layouts and styling. Combine that with the Divi Page Builder, which is an extremely easy and versatile drag and drop builder, and it becomes a monster do-anything, be-anything WordPress theme option.
Divi Announces Built-In Split Testing – perfect for Opt-In Pages, Landing Pages, and Sales Pages
So many clients use programs such as Leadpages or ClickFunnels and many times those programs are used for the purpose of ease of use, built-in split testing and conversion rates. But, you also have a heavy price for these programs. With Divi’s most recent update, they now offer Divi Leads Split Testing and a conversion optimization system!
With Divi Leads Split Testing we can build amazingly beautiful custom landing pages using a simple WordPress Install with Divi. This is the effective landing page tool that I have been waiting for, because for me, this puts Divi in the category of Leadpages or ClickFunnels at a fraction of the price! The look and feel you see can be created in Divi, plus you have the benefit that it’s fully customizable.
The Divi Leads Split Testing also allows you to not only A/B test pages, but modules within pages, individual sections, or rows. The results are also very in-depth. This includes bounce rates, click-through rates, engagement rates and sales rates.
Complete Websites with Easy User Interface
Divi also can be more than marketing pages. It can be an entire website with ease in functionality that anyone can easily use. For those who want to be able to add or change their own content easily, this is the theme for you. The drag and drop interface is the easiest interface I have seen in my 20 years of experience.
Sometimes with easy interfaces, you lose the power of options. Not with Divi. It integrates with membership plugins, commerce plugins, and community components with ease. It’s used to build full blown powerful website designs. In February, Elegant Themes launched the ability to import Squarespace sites with minimum fuss, as well as a new feature – the dynamic help system which, if needed, Divi will troubleshoot itself and help find the problem and fix it, saving a lot of time and frustration.
The support that Divi has from the WordPress Community is huge and I only see the future being brighter as Elegant Themes continues to offer amazing add-ons, modules, and more tools such as the split testing piece that was just introduced.

Recent Comments