

If you use Infusionsoft and WordPress, and you want to simplify and beautify (that’s a word right?!), your opt-in forms, there’s an easy solution…the Infusionsoft Form Tool WordPress plugin.
This new plugin allows you to create opt-in forms right inside of WordPress so you don’t have to switch back and forth between applications, you can design it right on the page and easily add forms on multiple pages too.
It’s easy to get started, and we have all the steps below:
Step One: Install the Plugin in WordPress
- Sign into your WordPress admin account.
- Within WordPress admin view, navigate to the Plugins tab on the sidebar.
- Click the Add New tab under the Plugins
- Search for Infusionsoft Official Opt-In Forms from the search bar found on the top right corner of the WordPress plugin directory view or click here to download it directly.

Step Two: Connect to Infusionsoft
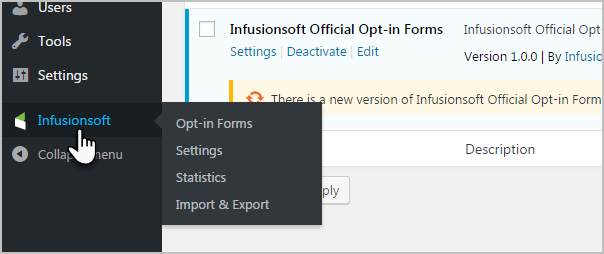
- In WordPress you’ll now see a new item on the left menu: Infusionsoft.
- Hover over this menu item and click Settings.
- Click the New Account
- Enter your application name. This is in your browser window, right before Infusionsoft.com. For example: abc123.infusionsoft.com. Your application name would be abc123.
- Enter your API key. Log into Infusionsoft; select Settings from the Admin menu. Scroll all the way down the page and you’ll see a section called: API. From that section copy the text next to Encrypted Key Value.
- Go back to WordPress and paste the value you just copied into the API key field.
- Click the Authorize button – you’ll be all set!!

Step 3: Create an Opt-In Form:
- From the WordPress dashboard, click on the Infusionsoft link to expand the sidebar and click Opt-in Forms.
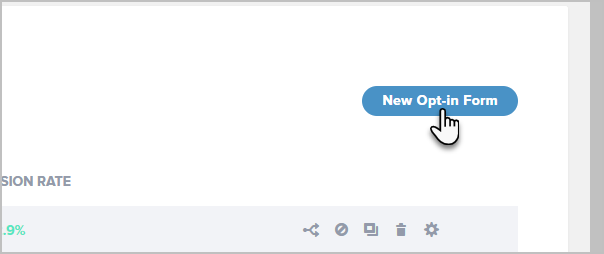
- Click on the New Opt-In button on the top right corner of the page from the Opt-In Forms sidebar tab.
Choose what type of opt-in form you would like to use:
- Pop Up Opt-In Form: The form will appear automatically after a specific amount of time, after visitors reach a particular point on your page, or even after visitors leave a comment or make a purchase – your choice!
- Fly In Opt-In Form: This form slides in at the bottom of your visitor’s screen, and you can set it to appear after a specific time or at a specific point on the page.
- Widget Opt-In Form: Use widget forms to create attractive opt-in forms for your sidebar, footer, or any other widget-friendly areas on your website.
- Locked Content Opt-In Form: Protected content forms allow you to offer content your visitors can “unlock” by opting in.
- Below Post Opt-In Form: You can use “Below Content” forms to place an opt-in opportunity at the end of your blog posts or pages. Visitors who read an entire post are highly engaged, so this is an effective way to turn that engagement into a conversion.
- Inline Opt-In Form: Want to insert an opt-in form in the middle of a blog post, rather than the end? Inline forms make it easy. You can display these forms virtually anywhere you’d like on any post or page on your website.
- Notification/Opt-In Bar: Increase your opt-ins, announce your promotions and drive traffic to the pages of your choice by using the attention grabbing top-of-page banner.
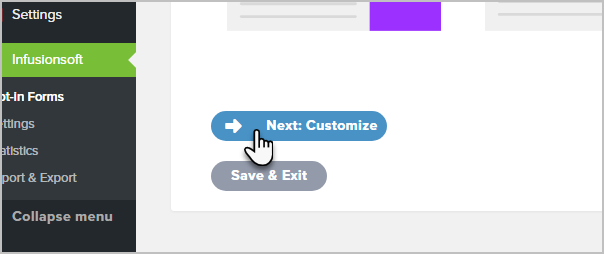
- Enter a name for your opt-in form then click the Next: Design button to advance to styling your opt-in form or click the Save & Exit button to save the opt-in and return later to edit its design and display settings.

- Choose one of the form layouts then click the blue Next: Customize button at the bottom.

- Choose one of any pre-designed templates based on preferred color and style. You can alter these colors after you select a template.
- Once you select a template, the screen will scroll to the bottom where you will click the blue Next: Customize button to advance to the next part of customization.

- You may customize the following on your opt-in form: copy, header, message, image, styling, background color, add your own CSS, and so much more too!
- Click the Preview button at the top right of the page as you make style changes to view your progress.

After customizing the above settings, you can click the blue Next: Display button to customize a ton of additional elements. Some of the ones we think you’ll use most often are:
- Trigger after time delay and how long: You can control when you want your form to appear.
- Trigger when a page element is clicked: If a visitor clicks a link your form will appear
- Limit to one display per session: Allows visitors to have a good website experience
- Choose where to display your form.
Click here to view all available options.
Once you have customized the above settings, you are finished the form setup process!
Step 4: Finalize Your Form
To finalize, you must click the gray Save & Exit button at the bottom of the Display Settings tab, and you’re all set.
If you want to use your form as part of a campaign, follow these steps:
- Navigate to Campaign Builder.
- From the campaign goal section on the left-hand sidebar, locate the WordPress Goal goal and drag it onto the campaign canvas.
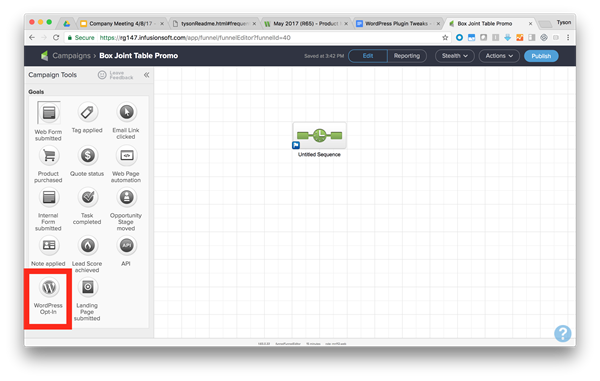
- With the WordPress Goal on the canvas, double-click on the goal to designate which Infusionsoft WordPress opt-in form completes this campaign goal.
- Select the name of the opt-in form from the drop-down list. If you have a long list of opt-ins, type the name of the desired form, and the form in the list will appear.
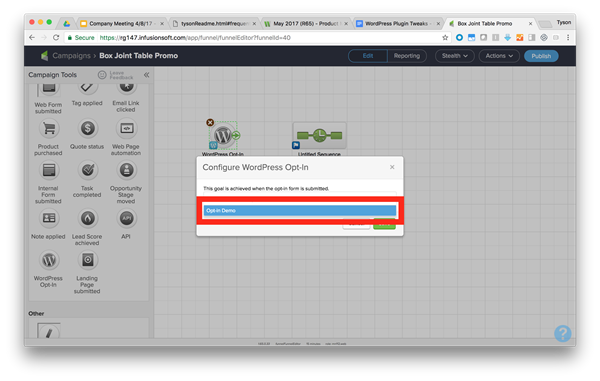
Once you select the desired opt-in form, finalize this configuration by clicking the green Save button. Then you’re ready to build out the rest of your campaign.
The Infusionsoft WordPress plugin is a great tool, but if you’re not sure how to set up or the best options to select, just reach out to the Smart to Finish Team. We’re always ready to help!
Recent Comments